MCU Bootloaders: Simulating shutdowns
Initially I planned on showcasing different solutions to last article’s closing problem: while the scratch-swap algorithm is robust, the logic newly introduced in the last article isn’t!
As I was about to solve this problem in my own bootloader, Polyboot (check out the first article in this series to learn more about it), I decided that it would be a good idea to first set up a test suite, which would help me track down where my algorithms aren’t resilient and — once they finally are — would let me have a more practical guarantee of their robustness.
I believe it would make the most sense for us to first have a look at what these tests are and how they work before seeing them in action in the next article.
This small detour is going to delve into some tricks in Rust (the language that I chose for Polyboot) that made testing my code possible. I have done my best to explain those aspects if you are foreign to Rust, and the techniques themselves can be ported to any other language!
The plan
Weren’t proofs enough?
I really enjoy proving that my code works as intended, but I unfortunately could not find any literature on how to formally prove that some algorithm is resistant to shutdowns or write errors (which can occur if the device doesn’t have enough power).
This meant that when coming up with the proof I covered in Resisting Shutdowns, I had to instead base myself on my intuition to come up with a sufficient condition for shutdown resiliency.
The fear at this stage of the project is that the models used in my proofs could be flawed. This is a problem that I had already encountered, even while using computer theorem provers: a proof could look thorough and error-free, but there’s no guarantee that the input or output parameters align well with reality.
It thus wouldn’t hurt to have a set of tests on top of these proofs, as an alternative source of trust for the software that I wrote.
My plan is to test my bootloader both through software emulation (we’ll see how I did that in a bit) and on the hardware itself:
- Software tests are easy to set up and automate and are pretty much free to run, but they must rely on a model of reality, which could be flawed.
- Hardware tests can bypass the need for a model, but they are harder to automate and (in the case of flash memory) will slowly wear the device, so I was advised to only perform hardware tests manually.
Today, we will focus on how I simulated shutdowns in software tests, using some neat Rust tricks that made this task a lot easier :)
Making code testable
Before writing tests, we first need to ensure that our code can be tested! There is a bit of work involved in the case of a bootloader, since it needs to directly interact with the flash memory.
To test this kind of code in C, you would need to use some #ifdef and #ifndef to conditionally access the “real” flash memory or a testing flash memory.
A cleaner way to make code that interacts with its environment testable is to create a boundary between the logic and the driver code. In Rust, this can be achieved using traits and generics!
Traits are the Rust equivalent to OOP interfaces (in Java and C#), abstract classes (in C++) and signatures (in OCaml): they define some kind of shared behavior among the types that may choose to implement them.
Functions (and types) can then be made generic, by accepting a type as parameter and relying on the shared behavior defined in traits. Unlike C++ and other languages that rely on syntactical templating, generic functions in Rust must state explicitely which traits the generic type must implement. This prevents sneaky bugs caused by duck typing.
 An illustration of how generic functions can rely on the shared behavior of a trait.
A trait for flash memory
In our case, we want a trait to describe the behavior of flash memory (check out last article’s recap for a refresher).
Such a trait exists within the embedded-storage library, which boils down to the following:
pub trait NorFlash {
    /// The type of errors that implementations may return,
    /// so that they can be handled.
    type Error;

    /// The function to call to write data from `bytes`
    /// into flash memory, at address `offset`.
    fn write(
        &mut self,
        offset: u32,
        bytes: &[u8]
    ) -> Result<(), Self::Error>;

    /// The word size, which is the alignment required
    /// for writes: both `offset` and `bytes.len()` in
    /// `write()` must be a multiple of this value.
    const WRITE_SIZE: usize;

    /* ... */
}
I have omitted parts of NorFlash for simplicity.
For most applications, this trait will fit the bill: it can be used to interact with flash memory (using for instance write) and the parameters are available as compile-time constants (like WRITE_SIZE for the word size).
Unfortunately for me, my bootloader is one of the few applications that runs into some issues with NorFlash’s design:
The different algorithms in Polyboot need to handle flash devices with different parameters; treating those parameters as compile-time constants adds a huge layer of complexity and would run into current limitations of Rust.
My own trait
After unsuccessfully fighting the NorFlash trait for a week, I decided to simply implement my own, which takes into account the needs of my bootloader. Here is a snippet of it:
pub trait Flash {
    // Errors should be printable.
    type Error: Debug;

    // This is the same function as `NorFlash`.
    fn write(
        &mut self,
        offset: u32,
        bytes: &[u8]
    ) -> Result<(), Self::Error>;

    /// Returns the word size: arguments to `write` must be
    /// multiples of this value.
    fn write_align(&self) -> u32;

    /* ... */
}
Likewise, I am only including parts of Flash.
WRITE_SIZE is gone and has become a method, called write_align, that returns a u32 (so no need to convert to/from usize with NorFlash).
What are you going to do with
NorFlashthen?
The drivers for flash memory that my bootloader uses are currently all defined in terms of NorFlash.
This isn’t an issue, though, as I can easily make a wrapper for those drivers that will implement my own trait.
This conversion is only possible in the NorFlash -> Flash direction, though, since I can’t obtain a constant back out of the write_align method.
Isolating hardware-specific code
There are parts of the code for the bootloader that are specific to microcontrollers. This includes the drivers for flash memory, which I cannot compile for my machine.
Any algorithm that I want to test must thus be free of hardware-specific code. The way I did this in Rust was to split my code up into multiple crates: the equivalent of packages in Python or Node.JS.
Each crate has its own set of dependencies, which allows me to have a crate that specializes in setting up the drivers for the microcontroller, and to move the rest of the logic into a shared crate that doesn’t import any of the hardware-specific dependencies.
The behavior that I could extract into shared was then made generic, so that it could work with any implementation of Flash, such as the one we will see right now!
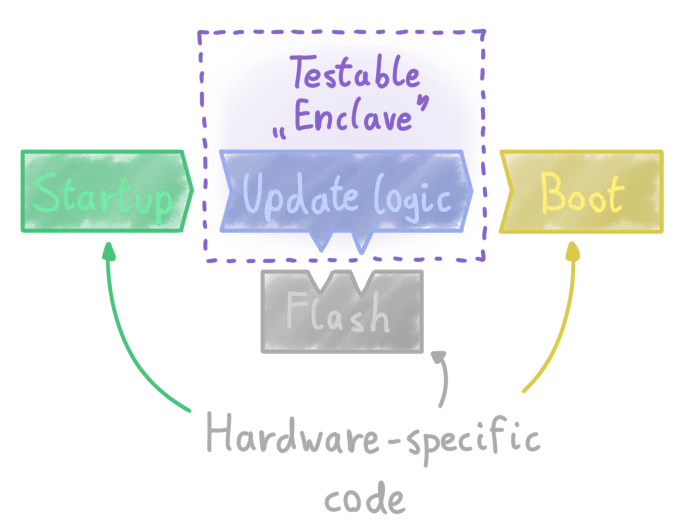 Making the update logic generic lets me test it, as it isn’t hardware-bound anymore.
Implementing Flash
In Rust, we say that a given type implements a trait if it shares the behavior defined by that trait.
This is the same idea as writing class List implements Iterable in Java or C# or class List: public Iterable in C++.
Let’s have a look at a very simple type that implements Flash: a structure that stores all of the flash data in RAM, that is meant to be used on my computer to implement all kinds of software-based tests.
Let’s call it SimFlash and define it like so:
// This line lets `SimFlash` be cloned and compared:
#[derive(Clone, PartialEq)]
pub struct SimFlash {
    // `Vec<T>` is a contiguous array stored in heap:
    pub data: Vec<u8>,
}
We then implement the Flash trait for SimFlash, to indicate to the language that SimFlash behaves like flash memory:
impl Flash for SimFlash {
    // You will soon see what `SimFlashError` is :)
    type Error = SimFlashError;

    fn write(
        &mut self,
        offset: u32,
        bytes: &[u8]
    ) -> Result<(), Self::Error> {
        let start = offset as usize;
        let end = start + bytes.len();

        // Copy `bytes` into `self.data[start..end]`
        self.data[start..end].copy_from_slice(bytes);
    }

    /* ... */
}
Uhm… I think you forgot the whole
write_alignthing.
You’re right! As of now SimFlash blindly accepts incorrect write requests.
To fix that, we will need to first define an error type, SimFlashError, using an enum (Rust’s implementation of sum types):
#[derive(Clone, PartialEq, Debug)]
pub enum SimFlashErrorKind {
    /// The variant that we will focus on today:
    ///
    /// Returned when `offset` or `bytes.len()`
    /// are not a multiple of the word size.
    NotAligned {
        alignment: u32,
        value: u32,
    },
    /* ... */
}
This enum also contains a few other variants, omitted here.
We also need to add the word size to SimFlash:
#[derive(Debug, Clone)]
pub struct SimFlash {
    pub data: Vec<u8>,
    word_size: u32,
}
And finally, modify write to check that the parameters correctly abide by the rules of flash memory:
impl Flash for SimFlash {
    fn write_align(&self) -> u32 {
        self.word_size
    }

    fn write(
        &mut self,
        offset: u32,
        bytes: &[u8]
    ) -> Result<(), Self::Error> {
        // Checks that `offset` is a multiple of `word_size`:
        if offset % self.word_size != 0 {
            return Err(SimFlashError::NotAligned {
                alignment: self.word_size,
                value: offset,
            });
        }

        // Same thing with `bytes.len()`:
        if bytes.len() as u32 % self.word_size != 0 {
            return Err(SimFlashError::NotAligned {
                alignment: self.word_size,
                value: bytes.len() as u32,
            });
        }

        let start = offset as usize;
        let end = start + bytes.len();

        /* ... */
    }

    /* ... */
}
Injecting errors
With SimFlash alone, it’s now possible to test the normal execution of our bootloader, through unit tests or bigger integration tests.
What I was more excited about were the ways in which I could extend SimFlash to introduce different kinds of errors,
to simulate the trickier scenarios in which my bootloader might find itself in.
This idea is also known as Software Fault Injection: willingly introducing incorrect behavior, to see how the algorithms react to it.
What errors will we introduce?
For this project, I decided to only focus on two kinds of errors:
- Sudden shutdowns: when this happens, the algorithm is not able to continue working and may be started again later.
- Detectable write errors: bits that should be programmed may fail to do so in such a way that it can be observed by reading back memory.
For both of these kinds of errors, the goal of this simulation will be to create a superset of the errors that could be observed in real life. This way, if the bootloader passes the tests with flying colors, then we can be confident that it will do well on an actual microcontroller.
As mentionned previously, today’s focus is on sudden shutdowns. We will have other opportunities to visit how I tested write errors later on :)
 Testing code through simulations is like training oneself on video-games. Kind of.
Some kinds of error that I chose to leave aside
Unlike the two errors above, there isn’t a way to detect the following ones with a 100% probability, so I chose to not focus on them:
- Non-detectable write errors: bits that have only partially been programmed and whose value may randomly be read as
0or1. There’s a non-zero probability that affected bits will be read correctly… until it’s too late. - Failure to erase flash: if flash memory wears down too much, then erasure may stop working. At this point there’s little that the bootloader can do, especially if the primary partition is affected.
- Program disturbs: when programming a bit, (physically) nearby bits may accidentally get programmed through inductance, resulting in
0s appearing where they shouldn’t be. This is worsened by flash wear and there is no way to remedy it other than only programming each word the least amount of times (ie. once) - Execution errors: in more extreme scenarios, the CPU itself might behave incorrectly. It should be obvious how hardening against this kind of error is really tricky.
- Kinetic attacks: I saw the resistance to these as an optimization target written somewhere and the idea of “optimizing my bootloader against kinetic attacks” made me chuckle. Is your code resistant to kinetic attacks?
You can read more about some of these issues and where they stem from in Roberto Bez et al, “Introduction to flash memory”.
Simulating shutdowns
How the hell are you going to simulate that?
The first idea that I had, which is similar to how MCUBoot does their fault injection, is to attach a debugger to the bootloader, let it run for a while then interrupt it to simulate a shutdown. If this sounds like a bad idea to you, that’s because it kind of is: compiler optimizations, differences in the target platform and delays introduced by the debugger will easily skew the results and cause my tests to miss edge cases.
What I needed was something reliable, that can be triggered during any write or erase operation and that will prevent any further operation.
If you squint at the definition of Flash, then you might see where this is going…
Instead of trying to stop the program from the outside, I can stop it from the inside, by making a special implementation of Flash that will return an error after a chosen number of flash operations:
pub struct ShutdownFlash<F> {
    /// The implementation of `Flash` that
    /// `ShutdownFlash` will use before the shutdown:
    wrapped_flash: F,

    /// The number of operations that occured so far:
    operations: usize,

    /// The maximum number of operations allowed:
    max_operations: usize,
}

pub enum ShutdownFlashError<FErr> {
    WrappedError(FErr),
    /// The error returned whenever a shutdown occurs:
    Shutdown,
}

impl<F: Flash> Flash for ShutdownFlash<F> {
    type Error = ShutdownFlashError<F::Error>;

    fn write(
        &mut self,
        offset: u32,
        bytes: &[u8]
    ) -> Result<(), Self::Error> {
        if self.operations >= self.max_operations
            && self.max_operations > 0 {
            return Err(ShutdownFlashError::Shutdown);
        }
        self.operations += 1;

        self.wrapped_flash.write(offset, bytes).into()
    }

    /* ... */
}
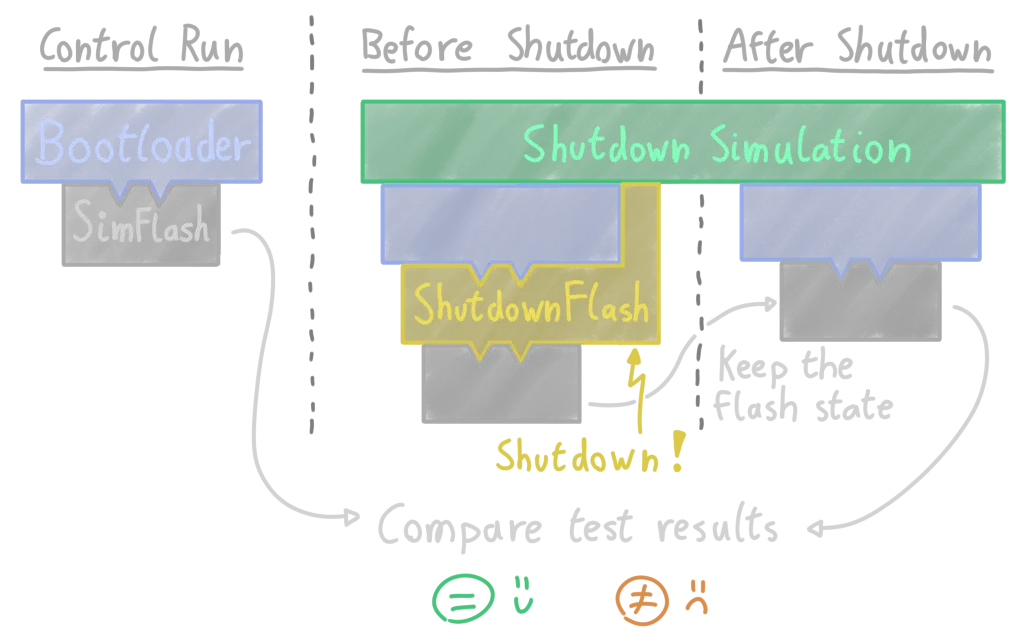
The idea for the shutdown test will be to first do a control run, letting us gather from it the total number of operations and the expected state of the flash after the bootloader finishes.
Then, I run many shutdown simulations, one for each point at which a shutdown could occur. A single simulation goes like this:
- The bootloader runs with
ShutdownSimulation, until the “shutdown” occurs. - The error bubbles up and I can “catch” it by verifying that the bootloader did return
Result::Err. - The bootloader runs again, this time without
ShutdownSimulation.
If at the end of all of this, the bootloader yielded the same state as it would without any of the simulated shutdowns, then we can claim that it was resilient to shutdowns. Yay!
Making the testing code generic (using GATs).
I knew it wouldn’t be that easy.
To be fair, the previous solution is good enough if you are simply going to hard-code functions in the tests. However, if you, like me, prefer to write reusable code, then some more advanced (and interesting) Rust techniques will be needed.
I wanted to run different kinds of tests on different areas of the bootloader; copy-pasting my code a dozen of times simply wasn’t an option.
Instead, I split the testing logic into two components: the runner and the logic. The logic provides to the runner the initial state, the algorithm to test and how to parse the data back at the end for comparison.
In the example of the shutdown simulation, the runner will run the logic’s algorithm with ShutdownFlash, catch the error and then run it again without ShutdownFlash.
To glue them together, we of course need another trait :)
pub trait Logic {
    // Implementations of `Logic` must provide their own
    // `Flash` type that can be cloned and compared.
    type LogicFlash: Flash + Clone + PartialEq;

    // Called for each test, to create a fresh state.
    fn initialize(&self) -> Self::LogicFlash;

    // The type of errors that `simulate` could return:
    type LogicError<FErr: Debug>: Debug;

    // The heart of this trait: should implement the logic
    // to be tested.
    fn simulate<F: Flash>(
        &self,
        flash: &mut F
    ) -> Result<(), Self::LogicError<F::Error>>;

    // The type of the data extracted after the simulation.
    type Parsed: Debug + PartialEq;

    fn parse(&self, flash: &mut Self::LogicFlash) -> Self::Parsed;
}
Is that… a generic associated type?
type LogicError<FErr: Debug>: Debug;
Let me unravel this:
initialize() returns a type that the implementor of Logic chooses.
This type should itself implement Flash, Clone and Debug.
simulate(flash) may be called with an instance of Logic::LogicFlash, but it could also be called with ShutdownFlash.
For this reason, it needs to be generic: F may be any type that implements Flash.
Where it gets trickier is when I try to return an error in simulate: that error may originate from flash (whose type is generic), but it could also originate from somewhere else.
I thus want to give the implementor of Logic the option to state its error type (LogicError) in terms of F::Error,
using the recently-stabilized generic associated type: a generic type, within a trait.
The return type of simulate instanciates LogicError with the error type of F, and wraps it in a Result.
Lastly, parse extracts data from the final state of the flash, to check the result of the test.
Making a little user interface
I very quickly realized that debugging a failed test case among a thousand repeated simulations was hell.
My first attempt to remedy this was to add logging, but that only worsened the problem: I now had to sift through thousands of test cases and logs. Nuh uh, not happening.
I instead took the decision to spend an afternoon to create a small graphical interface, that would let me navigate the test results and the logs for each of those. I also wanted to be able to see how the flash memory looked like just before the simulated shutdown, to get a sense of where things went wrong.
I found a neat little library called ratatui that allowed me to quickly set up a basic terminal user interface, like so:
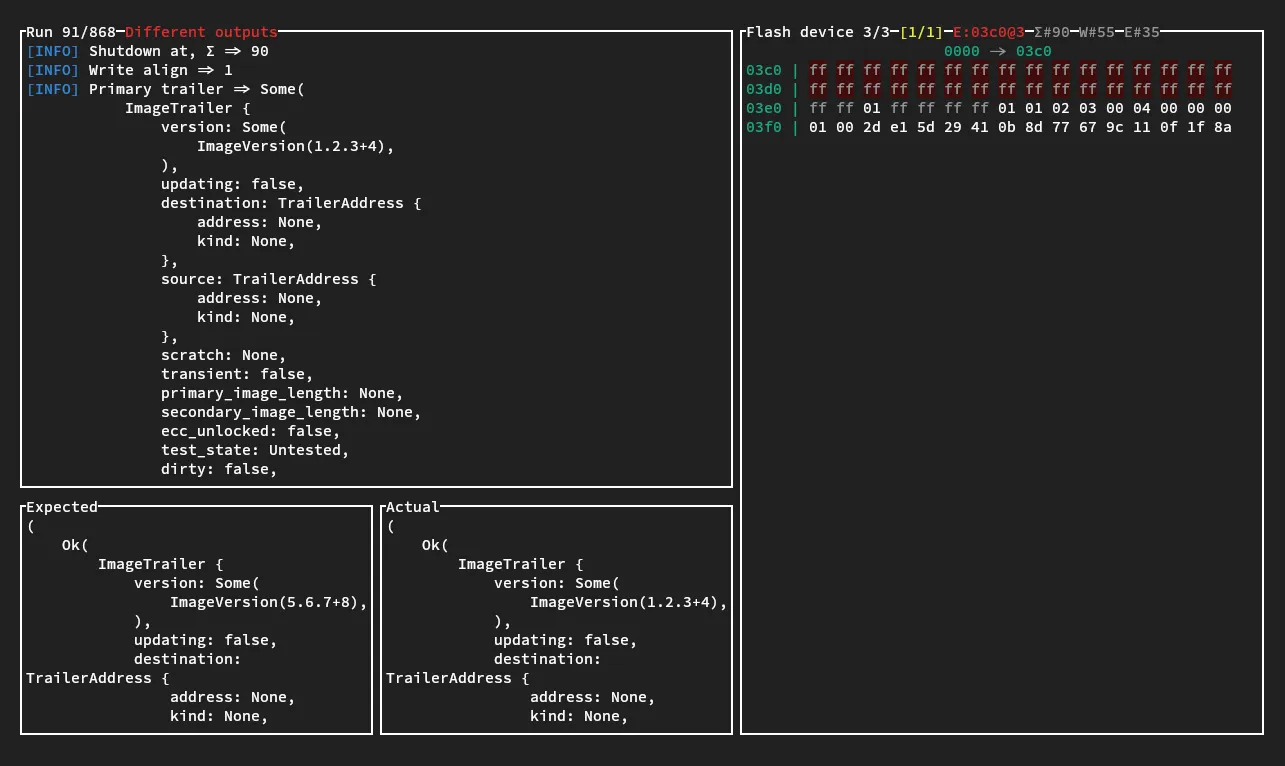
The tool only displays a single test case at a time: on the left are its logs and the reason for why that test case failed. On the right is a view of flash memory, with large, erased chunks skipped, similar to hexdump.
I can also switch between the different test cases and the different partitions of flash memory with simple keyboard controls.
And… that’s it! I only added two features later on (highlighting the last operation and having multiple snapshots), but this set of features was enough to be able to debug and fix why my code wasn’t fully resilient.
Getting used to this tool reminded me of my Dwarf Fortress days, where I had memorized all of the keybinds and could tell that
t was a toad,
≡ a pile of charcoal
and ☼ an uncut amethyst.
Well, except that now I was looking at little-endian 32-bit words and magic bytes, and the things I had instead memorized were the memory layouts of the image headers and trailers.
Towards reliability
Thanks to this little detour, it will be a lot easier to make the last remaining parts of our bootloader fully resilient to shutdowns, using the tests we put in place to verify this property. In fact, the scratch-swap algorithm itself already passes these tests with flying colors!
We’ll see in the next articles how I used to tests to iteratively come up with the current solution for Polyboot to manage trailers while being resilient!
Congratulations on making it this far! If you are reading this, then I’m still writing the next article in this series (or you’re looking at an archive of this page; oops). Follow me on BlueSky if you want to be notified of when the next article is ready!